
This article was originally written in December 2015. It was imported to the new blog in 2018
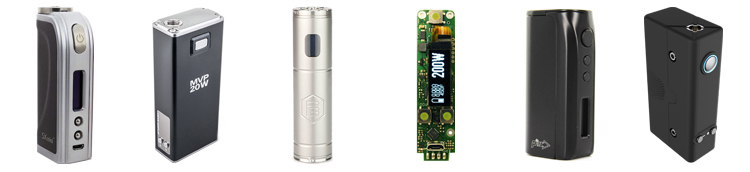
What is a regulated mod?
A regulated mod in the vaping world is a device that has a (micro-)controller sitting between the battery and the atomizer. Its purpose is to provide a stable power signal to the atomizer regardless of the battery charge. By providing a stable power signal, vape quality can remain constant.
If no controller is present between the battery and the atomizer (i.e. an unregulated mod or a mechanical mod), the battery power is directly transferred to the coil. As the battery sags and loses its charge, so is the power transferred to the atomizer. This affects vape quality, as the power is slowly reduced after each use of the vaporizer.
Besides providing a stable source of power, a regulated mod can also offer multiple benefits compared to an unregulated/mechanical mod. For example:
- Power selection : The user can control the amount of power transferred to the atomizer
- Voltage selection: The user can control the voltage transferred to the atomizer
- Short-Circuit Protection: Should a short circuit occur, the controller can “break” the connection to the battery, preventing it from venting or exploding.
- Battery charging.
- Efficient use of battery: In some scenarios, a battery in a regulated mod can last longer than in a mechanical mod.
- Many more…
As technology advances, more features are added to regulated mods. Newer technologies allow us to upgrade, customize and configure the controllers of our device (examples: the Evolv DNA200 and Yihi SX 350Jv2 chips)
Now that we have a basic top-level understanding of what a regulated mod is, we can explain how it works.
How does it work?
A regulated mod receives power from the battery and transfers it to the atomizer. This can be broken down into 2 steps: Input Side and Output Side.
The Input Side will pull the power from the battery to the controller, and the Output Side will push the power from the controller to the atomizer. This transfer is done using a DC-DC converter located on the controller.
Controller Efficiency will determine how much power will be lost in that transfer.
Controller Specifications will determine if the requested power can actually be transferred to the atomizer.
We will look at each of these elements and try our best to explain them.


Controller Efficiency
Controller efficiency determines how much power will be lost when transferred from the battery to the atomizer. Lost power will usually be converted to heat, which will increase the temperature of the controller. Heat reduces the service life of any electronics!
As efficiency increases, power loss decreases. This leads to less power pulled from the battery and a cooler controller.
It is important to note that the efficiency percentage is an average over the power range of the controller. As power goes up, efficiency goes down.
| Board | Efficiency (%) |
|---|---|
| Evolv DNA40 | 94 |
| Evolv DNA200 | 97 |
| Yihi SX350J (V1&V2) | 93 |
| Yihi SX350 | 92 |
Knowing the efficiency of our controller, we can calculate how much power will actually be pulled from our battery. We simply multiply the power requirement by 100 and divide it by the controller efficiency. Power requirement is the wattage set to be transferred to the atomizer.
Power Pulled From Battery = Power Requirement * 100/ Controller Efficiency
Input Side
The Input Side is where the controller pulls power from the battery.
Ohm’s law states:
Power = Voltage * Current
- Power is the wattage that the controller wants to pull from the battery.
- Voltage is provided by the battery and cannot be controlled (besides charging the battery). A Lithium Ion battery will usually provide between 2.5 and 4.2V, with a nominal cell voltage of approximately 3.7V (average voltage output). The controllers minimum input voltage will determine the lowest voltage it will accept before considering the battery too weak or empty.
- Current is the amperage that will be drawn from the battery to obtain the power required. To calculate the current draw, we simply move Voltage from Ohm’s Law from the right of the equation to the left. This give us:
Current = Power/Voltage
Once we have our power requirement, we can move onto current draw. Since we cannot control the voltage that the battery will provide, we will work with 3 values: minimum voltage, maximum voltage and nominal voltage.
- The minimum voltage is set by the controller. If at any point during the power transfer from the battery that voltage is reached, the controller will consider the battery too weak to perform its duties and act accordingly (lower the power or simply stop the transfer). This value will vary from 2.8V to 3.3V depending on the controller.
- The maximum voltage is that of a fully charged battery. This voltage is approximately 4.2V
- The nominal voltage is the average voltage that will be provided by the cell. For Lithium-Ion batteries, that value is 3.7V.
Using Ohm’s law, we have determined earlier that:
Current = Power/Voltage
All we have to do is replace Power in “Current = Power/Voltage” with the right side of our power equation above for controller efficiency: Power = (Power set) * 100/ (Controller Efficiency).
We finally get:
Current = (Power set * 100/ Controller Efficiency) / Voltage
Since we are using 3 different voltages, we will have 3 different current values for the Amps drawn from the battery. This will provide us with a range of current that can be pulled from the battery at the requested power level.
IMPORTANT SAFETY INFORMATION:
Always use the minimum voltage with the above formula when pairing a battery with a regulated mod. Using the minimum voltage will ensure you are never stressing your battery outside of its specifications!
At 4.2V (maximum voltage):
Current = [(Power set) * 100/ (Controller Efficiency)] / Voltage = [20*100/94]/4.2 = 21.28/4.2 = 5.067 Amps
At 3.7V (nominal voltage):
Current = [(Power set) * 100/ (Controller Efficiency)] / Voltage = [20*100/94]/3.7 = 21.28/3.7 = 5.75 Amps
At 3.1V (minimum voltage):
Current = [(Power set) * 100/ (Controller Efficiency)] / Voltage = [20*100/94]/3.1 = 21.28/3.1 = 6.86 Amps
Following our formulas, we get the following maximum amp draw for our 4 popular mods according to their datasheets:
| Controller | Min Voltage (V) | Max Wattage (W) | Efficiency (%) | Max Amp Draw (A) |
|---|---|---|---|---|
| Evolv DNA40 | 3.1 | 40 | 94 | 13.73 |
| Evolv DNA200 | 9 | 200 | 97 | 22.91 |
| Yihi SX-350 | 3.2 | 60 | 92 | 20.38 |
| Yihi SX-350J | 3.2 | 60 | 93 | 20.16 |
| Yihi SX-350J V2 | 3.2 | 75 | 93 | 25.20 |
Now that we know the max amperage that will be drained from our battery for the Input Side, we need to understand how the controller will push that power to our atomizer coil.
Output Side
The Output Side consists of transferring the power from the controller to the atomizer coil.
This differs from the Input Side because in this power transfer, the coils resistance must be taken into account. That resistance will impact how that power will be transferred to the coil by varying the voltage and the current (amperage) sent.
Ohm’s law states:
Current = √ (Power/Resistance)
And
Voltage = √ (Power*Resistance)
We can calculate the resulting values using Ohm’s Law by simply knowing 2 constant values. In our case, Power and Resistance (we will ignore temperature control in this post):
- Power is the power that the controller has pulled from the battery (set by the user).
- Resistance is the kanthal coil resistance, which does not vary once installed (in reality it does vary by an extremely small amount that most controllers cannot detect).
Continuing with our previous example of a DNA40 at 20W, we’ll assume a 1.2 Ohm coil is installed on the atomizer.
To push 20W with a 1.2 Ohm coil we would need:
Current = √ (20/1.2) = 4.08A
Voltage = √ (20*1.2) = 4.90V
Therefore our controller will transfer 4.9V with 4.08A to the coil to provide it with 20W of power.
Controller Specifications
Every controller has output specifications for Voltage, Power, Amperage and Resistance. These specifications will determine if the controller can power the coil at the desired wattage.
Many controllers claim to provide a high wattage that can only be achieved using a coil resistance range much smaller than advertised!
Ohm’s law states:
Power = Voltage2/Resistance
And
Resistance = Voltage2/Power
With these 2 formulas, by knowing the maximum output voltage and power of our controller, we can calculate the maximum power that can be delivered to a specific coil and the range of resistances that can actually use all the power.
There are very few devices that can provide their full output power to the complete range of supported resistances. One of the few devices capable of doing this is the DNA40 by Evolv.
The Pioneer4You IPV D2 has the following output specifications:
- Output Voltage Range: 3.6-7V
- Output Power Range: 7-75W
- Output Current Range: 1-25A
- Atomizer Resistance range: 0.2-3.0 Ohms
By using the maximum voltage of the controller (7V), we can find the maximum power that can be delivered to a coil:
- A 3.0 Ohm coil would have a maximum power of: 72/3.0 = 16.33W
- A 2.0 Ohm coil: 72/2.0 = 24.5W
- A 1.0 Ohm coil: 72/1.0 = 49W
By using the maximum voltage of the controller (7V), we can find the highest resistance than can be powered at 75W:
- 72/75 = 0.65 Ohms
In order to be able to use the full power of the IPV D2, we would have to use coils with a resistance lower than 0.65 Ohm but higher than 0.2 Ohm (from the IPV D2 coil resistance specifications).
DC-DC Converters
DC(Direct Current)-DC Converters allow a controller to provide an output voltage different from the input voltage. This type of converter is the main element that allows a regulated mod to perform its duties. We will not discuss them in detail but simply explain their purpose and the types of converters available.
3 types of converters are found in regulated devices for vaping:
- Boost converter
This type of converter will transform an input voltage to an equal or greater output voltage.
The controller can not provide a voltage lower than the one provided by the battery. Many devices use this type of controller since it is cheaper to manufacture, imposing a minimum voltage that can force a higher wattage than requested/displayed on screen.
Sample devices that use this type of controller: Evolv DNA20/DNA30, Pioneer4You IPV 1/2/Mini/Mini2/D2(v1/2)
- Buck converter
This type of converter will transform an input voltage to an equal or lower output voltage.
The controller cannot provide a voltage higher than the one provided by the battery. This type of controller is usually found on devices using multiple batteries in series, which multiplies the voltage provided on the Input Side by the number of batteries.
Sample devices that use this type of controller: Evolv DNA200, Sigelei 150/150TC, SnowWolf 200W
- Buck-Boost converter
This type of controller will allow an output voltage greater or smaller than the input voltage.
It is a Boost and a Buck converter mixed into one. This converter is usually more complex and costly to manufacture than the other two.
Sample devices that use this type of controller: Evolv DNA40, Yihi SX350/J/v2
Conclusion
This completes our brief overview of what a regulated mod is and how it works. Hopefully you have found this information useful.
If you have any comment or find any mistakes, do not hesitate to leave a reply!
We would like to thank Brandon from Evolv for baring with my billion questions, the friendly Reddit ECR community for all the knowledge sharing, and Mooch for doing Gods work and testing the safety of the batteries we use in our mods!

[…] Home/Uncategorized/Coil resistance and battery life on regulated mods Previous […]